Categories
Attribution Digital Marketing eCommerce Google Ads Shopify

Optimize Shopify’s Google Ads Conversion Tracking

Here are some changes to make to your Google Ads conversion tracking after you connect Shopify’s Google & YouTube Shopping Channel.

STEP 1
Install the Google Shopping Channel

This guide assumes that you have the Google Shopping Channel installed on your Shopify store. If this is not the case, then:

  1. Install the Google & YouTube Shopping Channel
  2. Connect your Google Account
  3. Turn on Conversion Tracking

STEP 2
Remove Old Conversion Tracking Code

By connecting Shopify to Google Ads via the Google Shopping Channel, Shopify will begin sending conversion data to your Google Ads account. If you were already tracking conversions in Google Ads, then you need to make sure you are not duplicating your conversion data:

  • If you previously had a Google Ads conversion tracking script installed in your checkout, then remove that code.
  • If you were importing conversions from Google Analytics, stop importing those conversions.

STEP 3
Conversion Windows and Attribution Models

Although Shopify created multiple conversion actions, you only need to worry about the Google Shopping App Purchase conversion event.

Click on the Google Shopping App Purchase conversion action and update the following settings:

Old ValueNew Value
CountEvery ConversionOne
View-through Conversion Window30 days1 day
Engaged-view conversion window3 days1 day
Attribution ModelLast clickData Driven

One Conversion per click

If you count “Every Conversion” you increases the risk of double attribution across your various channels.

For example: A user clicks on your Google ad and makes a purchase. It makes sense to count and attribute this conversion to Google Ads. If this same user later receives your newsletter, and purchases again, then you probably want to attribute that sale to the Newsletter and NOT to Google. Setting conversion count to “One” instead of “Every” ensures that only the first sale gets attributed to google, and not the second.

Counting “Every” conversion increases the risk of double attribution

Click-Through Conversions

Arguably, you should set your Click-Through Conversion window to 30 days. 90 days seems extremely long, and could increases your chances of double attribution across multiple sales channels.

However, if you are using Performance Max or Automateed Bidding, the bidding algorithm can only take into account conversions that have occurred within the specified conversion window. So theoretically, the longer your conversion window, the more data for Smart Bidding to optimize with. So the 90 day click-conversion window can probably stay.

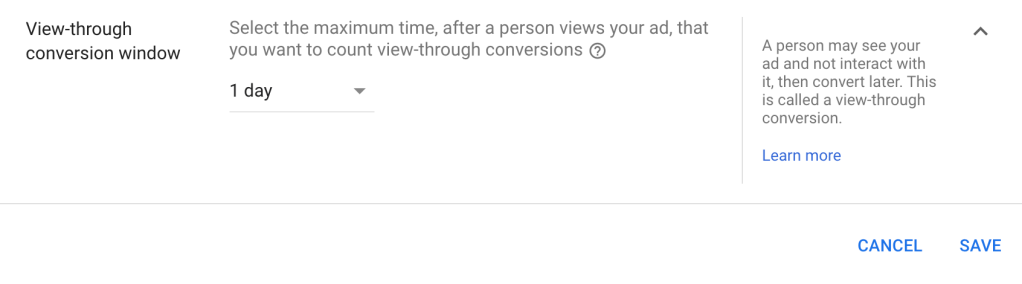
View-Through Conversions

Set the View-Through Conversion window to only 1 day. A longer View-Through conversion window is dangerous, and will lead to over attributing sales to Display Remarketing, YouTube, and Performance Max. This will invariably cause you to overspend on those campaigns.

A View-Through conversion window greater than 1 day is dangerous, and will lead to over attributing sales to undeserving channels.

Further Reading

Categories
Analytics Shopify

sag_organic and product_sync in Google Analytics

Last Updated: December 5, 2023

If you install the Google sales channel on Shopify, you may notice a rise in strange referrals in your Google Analytics reports.

Medium = product_sync and Campaign = sag_organic

Where do sag_organic and product_sync come from?

When the Google sales channel uploades your product feed to Google Merchant Center, it appends the following UTM tags to the product url:

UTM TagValue
utm_sourcegoogle
utm_mediumproduct_sync
utm_campaignsag_organic
utm_contentsag_organic

The following querystring is appended to your product’s link url:

&utm_medium=product_sync&utm_source=google&utm_content=sag_organic&utm_campaign=sag_organic

Why do we need these UTM parameter?

Today, you no longer need these UTM tags and you should remove them from your product urls.

These UTM parameters were created by Shopify to track organic free traffic from Google Shopping. They were meant to distinguish between organic traffic from Shopping vs organic traffic from Search.

Although well intentioned, this implementation altered the default behavior of Google Analytics, which was unexpected and not desirable.

Another issue with the Shopify implementation is that they didn’t include a canonical link in the feed. A canonical link ensures that only the “clean” version of the product link (without UTM tags) is included in Google’s search index. Without this, there is a risk that your organic search traffic will also include these UTM tags (which will really mess up your analytics).

What does sag_organic mean?

SAG stands for Surfaces Across Google.

Surfaces Across Google was the original “free shopping listings” in Google. It has since been renamed to “free shopping listings” and the name “SAG” is no longer used.

Fixing your Product Urls

If you set up Auto-Tagging correctly in both Google Ads and Google Merchant Center, Google Analytics will accurately separate Paid and Organic Shopping traffic.

Step 0
Switch to Classic Mode

To follow these steps, you need to be in Google Merchant Center “Classic” Mode. If you are instead in “Google Merchant Center Next” mode, follow these steps first:

  1. Click on the Help logo in the top right
  2. Click the last menu option “Use classic Merchant Center
  3. Confirm by clicking “Switch Now

Step 1
Remove the UTM tags

To remove the UTM parameters from your Product Links

  1. Go to Merchant Center > Products > Feeds
  2. Click on the Content API feed
  3. Click on the Feed Rules tab
  4. Click the big blue PLUS + button, type link in the field, and select link from the drop down.
  5. For Data Source, select Set to, type link and select link from the Primary Feed: Content API list.
  6. Click OK
  7. Set the default behaviour if the link is blank to “Leave Blank”
  8. Now go to Modifications > Add Modification
  9. Choose Optimize URL > Set Parameter
FunctionParameter Name
Remove Parameterutm_source
Remove Parameterutm_medium
Remove Parameterutm_campaign
Remove Parameterutm_content
  1. Click OK and look in the right side column preview to see if the link has been properly updated.
  2. Click Save as Draft and Apply

Step 2
Set your Canonical Link

“If you use tracking parameters in your link attributes, it is recommend that you use the canonical_link attribute to provide a canonical URL. Use the canonical_link attribute to ensure that products are associated with the correct URL in the Google Search index.”

Google Merchant Center Help
https://support.google.com/merchants/answer/188492?hl=en

To ensure that only the “clean” non-utm version of the product link is included in Google’s search index, follow these steps.

  1. Go to Merchant Center > Products > Feeds
  2. Click on the Content API feed
  3. Click on the Feed Rules tab
  4. Click the big blue PLUS + button to add a new Rule and type canonical and choose canonical link from the drop down.
  5. For Data Source, select Set to, type link and select link from the Processed Attributes list.
  6. Click OK
  7. Change the default behaviour if canonical_link has no value to “leave blank”
  8. Add Modification > Find and Replace
    Now add two Find & Replace operations: One to remove the UTM tags and another to remove the Currency parameter
#FindReplaceAdvanced
1&?utm_.+?(&|$)$(leave blank)Search as regular expression
2&currency=[^s]+(leave blank)Search as regular expression
  1. In Advanced Options, select “Search as regular expression
  2. Click OK and confirm in the right side column preview that the new link looks nice and clean, without any parameters appended.
  3. Click Save as Draft and Apply
Your canonical feed rules should look something like the above

Step 3
Configure Auto-Tagging

This will configure Google Ads and Google Merchant Center to properly tag your product urls.

  1. Google Ads (in the left hand menu)
    Settings > Account Settings > Auto Tagging: ON
  2. Google Merchant Center:
    Gear Icon > Conversion Settings > Auto Tagging: ON
  3. Google Analytics:
    Property Settings > Advanced Settings > Allow Manual Tagging to Override: OFF

Done!

You may need to wait a few hours for your feed to update with the new values. You should now have the default vanilla setup that Google Analytics expects.